Plugge’s Plateau
You are on the inland side of Plugge’s Plateau. New Zealand troops passed through here on the 25th of April 1915 on their way up to a hill called Baby 700, which is as far as they got on the day they landed.
The distinctive clay point to your left is called the Sphinx and you can see why they named it that. It looks a bit like the famous sphinx in Egypt, where Anzac troops trained before they landed at Gallipoli
Beyond the Sphinx, if you look to the right along the ridgeline, you’ll see a pyramid-shaped Turkish memorial which marks the forward slope of Baby 700, which became the Turkish frontline for the Gallipoli campaign.
If you look further along that ridge to the right, you’ll see a white stone marker in that copse of trees. This is the area of Quinn’s Post and if you continue further along the ridge you’ll see a flagpole with another stone memorial to its immediate right. That is the area of Courtney’s Post where Anzac troops spent months in trenches only a few metres away from the enemy.
Follow this round up onto the next small rise, and that’s the area of Steele’s Post.
If you then come round to those pine trees on the high ground, you can see an Anzac memorial. That is Lone Pine, held by the Australians, and where an epic battle took place in early August.
That entire ridge where all these posts are located, is known as Second Ridge. On the 25th of April 1915, by the time the New Zealanders arrived, the Australians were fighting all along this ridge, desperately holding back successive Ottoman counter-attacks. Most of the Australians had been drawn into fighting at Lone Pine.
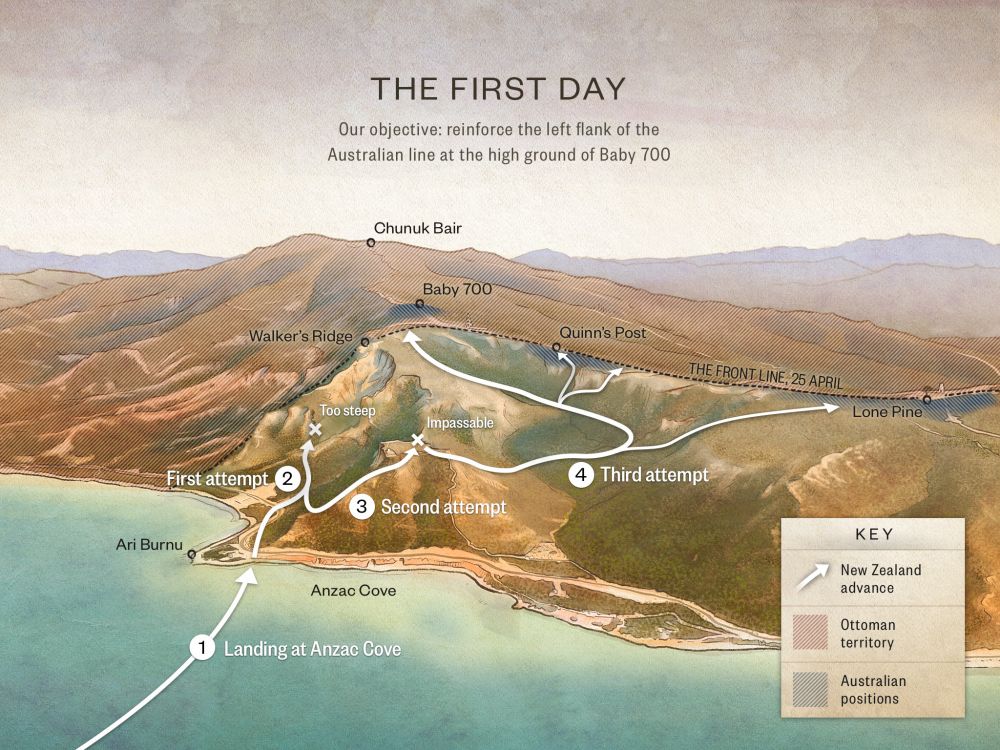
The New Zealanders tried to climb Walker’s Ridge, the spur that you can see beyond the Sphinx, to get to the higher ground from the beach. However, it was too steep so they were sent back in, up over Plugge’s Plateau, right here through this bush where we stand.
Imagine walking through this bush in single file thinking you’re going to go straight up to the ridge and suddenly – “oops” – you reach this spot and see the Razor Edge in front of you and it is far too steep to cross.
Lieutenant Spencer Westmacott of the Auckland Infantry Battalion, the young platoon commander who was leading, had two choices. He either had to go left, which would’ve taken him back to where he started, or go right.
Westmacott went right. He headed off down the path, winding along the cliff down into the valley junction that you can see to your right. He then headed up towards Baby 700. He knew that somewhere up there was the left of the Australian front line. By then, Westmacott was at the forefront of the Auckland Battalion. He picked up some Australians, and some of the Canterbury Battalion. His platoon was a hodge-podge of everyone who had come ashore and they were now trying to find out where they were and make their way up the valley to reinforce the Australian front line.
As they moved inland up the valley, they heard rifle firing and people yelling out ‘Stretcher-bearer!’ ‘Ammunition!’ ‘Reinforcements!’
Some of the stretcher-bearers and men who were carrying ammunition went and helped, so Westmacott’s men were drawn away up onto the high ground on the right.
Westmacott finally got to Baby 700. He and his men were the first New Zealanders in action on the 25th of April and they were reinforced by other New Zealanders later that day.
The memorial at Baby 700 marks the 57th Turkish Regiment cemetery. This is where the Turkish officer Mustafa Kemal, later known as Ataturk, attacked to drive the Anzacs back into the sea. Late in the afternoon of the 25th of April, the Turks pushed the New Zealanders back off the high ground and down the spur around the Sphinx, known as Russell’s Top. The Anzacs were also driven back into Quinn’s Post, Courtney’s Post, and Steele’s Post – those little gullies off the side of Second Ridge. Meanwhile the Australians hung on to Lone Pine and Second Ridge became the Anzac front line for the next nine months.